With Halloween rapidly approaching I had an idea in mind. Why not create a diseased beauty queen? So with my Friday being free, I decided to give the look a go and see if I can pull it off. I'm not feeling 100% at the moment, but I thought that will be an advantage, it's not a beauty look after all...

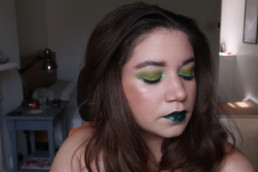
When I think of a beauty pageant I think of smokey eyes, rosy cheeks and nude lips, so that’s what I was going for makeup-wise. I started with the eyes. Quite standard, I just used some gel eyeliner, smudged it out with a fluffy synthetic brush (it blends the creamy formula better and it’s also easier to clean later on) then patted some black eyeshadow on top and a bit of dark brown in the crease and it was done. I added some shimmery white shade in the inner corners, to open up the eyes. Once I was finished with everything, I’ve applied some false eyelashes and smudged some of the dark brown eyeshadow on the lower lash line and the eyes were done. I’ve filled in my eyebrows the same way as I would do normally.
Before I moved on to the fun part I applied some hydrating primer to my face, since due to me being ill it was a bit dry and dehydrated. You can skip this step if you want to. To create the holes on the surface of the skin I used some nose&scar wax. I rolled a bit of wax into a ball shape than flattened it out in between my hands to get a somewhat circular shape. Obviously, it can be any shape, this is just what I had in mind. I only realised after I applied the second wax piece that this is the easiest method… You live and learn. To attach these to my face I used spirit gum. (You can use any other adhesive you might have on hand, but please make sure, that you have the correct remover! Stay safe, please.) Apply it to anywhere where you want your wax to be, tap it a bit with your fingers till it gets tacky and then you are good to apply the wax. To smooth out the edges and blend it into the skin use some vaseline and your fingers. You can also smooth out the surface, this way if needed, but it’s an infection, after all, it doesn’t have to be perfect. You can apply as many pieces as you want, it doesn’t matter.
Now comes the time-consuming part, making the holes. There are different tools you can use, I opted for some dotting tools (yep, the ones you use for nail art) in different sizes for the smaller holes and the end of a brush for the big ones. Just make sure you don’t use anything sharp, you don’t want to hurt yourself! Apply a coat of vaseline to whatever tool you use I would say after every third hole. Otherwise, the wax could stick to it and you can pull it up from the skin and ruin your work.
Once I was happy with the overall look I applied a light dusting of powder over the wax to make it less sticky, then went in with foundation all over my face and neck. I used a sponge because a brush could move my wax pieces and this way I could lightly pat foundation on top of it. It doesn’t have to be perfect since we’ll paint on top of it, but it has to match your skin tone more or less. I also added some concealer under my eyes before setting everything with powder. Although later I decided to add some red shades under my eyes, to give a bit of a sick effect to the look so maybe you can skip concealing.
Now comes the paintwork. I used a light warm brown and a red shade mixed on a smaller blending brush to add some colour around the wax pieces. This will make your skin look irritated. I also used it on some parts of the surface of the wax and on random points of my face and neck. Those are the areas, where the holes will appear next on our queen.
Then I went in with some cream paint. I used a mixture of blue and dark red on the bigger holes and a lighter red on the smaller ones. If you don’t have cream paint you can use your lipsticks or some creamier eye or lip liner for this. Then I also added some black to the deeper holes later to make them appear deeper. After this, I reached for a stippling sponge to add some blue, yellow and dark red around and on the surface of the wax. I also patted the area with my finger to blend it in as much as I can.


Now, all we have left are the lips. Since I had an intense smokey eye I went with nude lips. Also, I didn’t want to take the attention away from the disgusting infected parts… If I already worked so long on them I want people to look at it! For my lips, I used a pinky-nude lip liner to slightly overdraw my lips and also filled them in with the same colour. On top of that, I applied some shiny nude lip gloss and it was done.
As a final gory touch, I added some fake blood to the deeper holes and it really helped to make it look even more dreadful. Now all you have to do is add your crown and a killer outfit!


The whole process took me about 2,5 hours since there are loads of little details to work on. It’s definitely time-consuming, but in my opinion, the final result is worth it. You can make it a bit more creepy with some contacts!
Let me know what you think of this look and if anyone tries it please tag me on your picture!
Have a nice day!
Related Posts